Hot Tub Maintenance & Care
Hot Tub Troubleshooting
If you are experiencing a problem with your spa, before you call Customer Service, you may be able to resolve it yourself by following these troubleshooting steps.
There are many problems spa owners can identify and resolve themselves. This troubleshooting guide will help you with many common problems and may save you a service call. We don’t expect spa owners to be technicians, so everything contained in this guide is non-technical and does not involve tools. You will never be asked to do something that will void your warranty. You may not be able to resolve every problem your spa may have. When that happens, you will be advised to call for service.
If your spa is under warranty, you must have all service performed by a qualified spa service tech or you will void your warranty.
Before you make repairs to your spa, check that it’s still under warranty. If it is, and it’s a part that’s covered by the warranty, you should call your spa dealer to schedule service. Some parts are not covered under the warranty, particularly wearable parts such as jet inserts and lights. For more information on what parts are covered by the warranty, refer to the spa warranties page on this site.
Message on the control panel
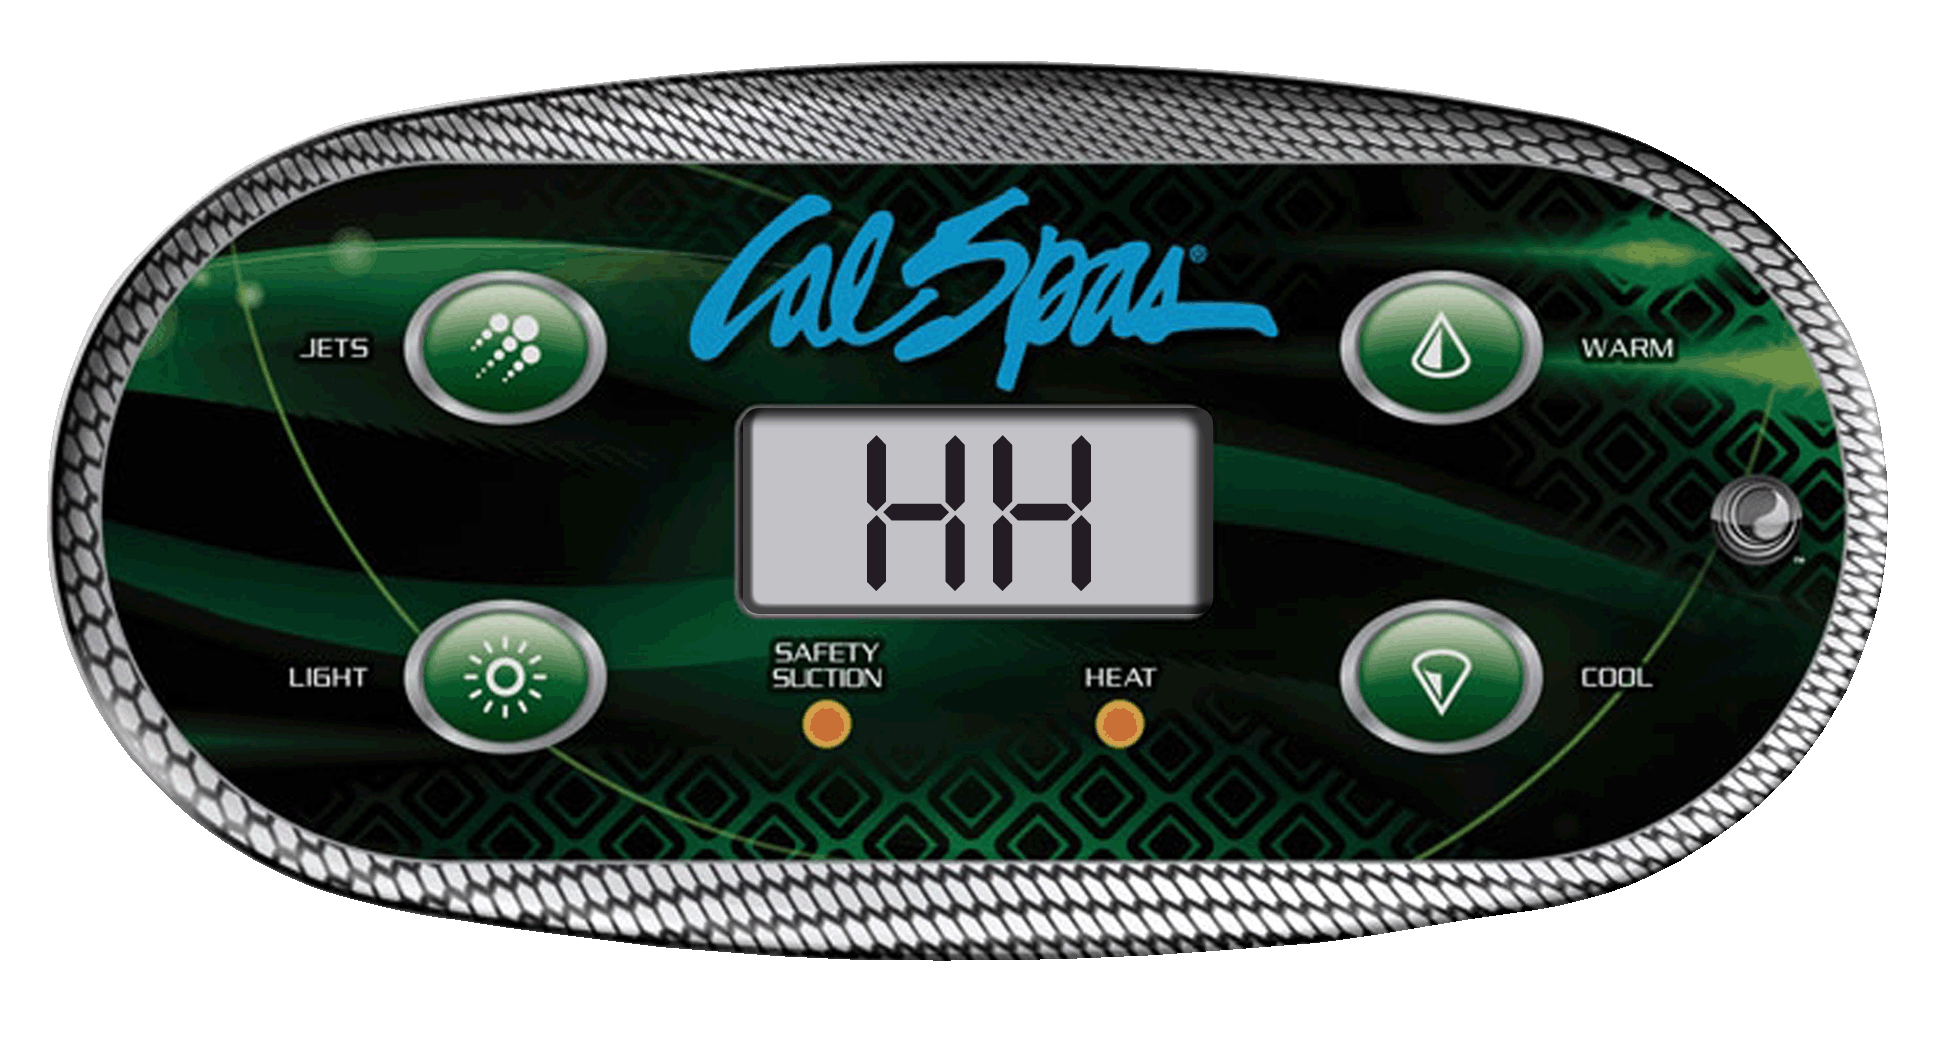
1. A message on the control panel may indicate a problem.
Note: The message troubleshooting shown here applies to Cal Spa control panels built in 2013 and earlier. Beginning with the 2014 product line, Cal Spa control panels display different message codes. For a description of these message codes, see the owner’s manual.
Problems starting up
Note: The priming procedure described here applies to Cal Spas built in 2013 and earlier. Beginning with the 2014 product line, Cal Spas pumps have a different method of priming. See the 2014 owner’s manual for a full description.
Power and electrical problems
3. Control panel doesn’t respond
4. Spa uses too much electricity (very high power bills)
Note: The priming procedure described here applies to Cal Spas built in 2013 and earlier. Beginning with the 2014 product line, Cal Spas pumps have a different method of priming. See the 2014 owner’s manual for a full description.
Heat problems
Jet problems
Water pressure problems
1. ow water pressure throughout spa
2. Some jets have low or no pressure
3. No water pressure throughout spa
Pump problems
1. Pump is very noisy when it runs
2.
3. Pump has a burning smell while running
Air stream problems
1. No air bubbles when valve is opened
Water quality problems
card first 1Maintenance Schedule
Keep your spa clean and well-maintained, and you will enjoy years of enjoyment relaxing in your spa. Learn about common tasks involved in spa ownership.
Daily
Weekly and before each use
2. Click here to learn more about maintaining your water quality.
Monthly
1. Deep clean your spa’s filter.
Every two to four months
Change the spa water. How often you change the water depends on how much you use the spa. When you change the water, you will need to:
3. Refill your spa with fresh water.
Once a year
As needed
1. Clean and polish the acrylic surface.
2. Clean and treat the spa cover and pillows.
3. Spa panel maintenance and repair
4. Winterizing (draining for cold climate)
card first 1Hot Tub Vacation Care
You can leave your spa unattended for up to two weeks if you follow these instructions:
1. Set the spa to Sleep Mode. (See your owner’s manual for changing modes.)
2. Adjust the pH. See instructions on water quality.
3. Shock the water (add either chlorine or bromine sanitizer).See instructions on shocking the water.
4. When you return, check and adjust the pH and shock the water.
5. If you will not be using your spa for longer than 14 days and a spa maintenance service is not available, we strongly recommend you drain or winterize your spa.
ALWAYS lock your cover using the cover locks if you plan to be away from home and the spa is filled with water.
Click here to learn how to drain your spa.
Click here to learn how to winterize your spa.
card first 1Draining Your Hot Tub
Your spa should be drained every four to six months and refilled with fresh tap water. The following are recommended methods for draining your spa:
Do not open the control box. These instructions contain only basic guidance for this problem. Anything beyond the scope of these instructions should be performed by a qualified spa technician or an electrician.
FOR SPAS WITH CABINET-MOUNTED DRAIN:
1. Turn off the power at the breaker.
2. Remove all filters.
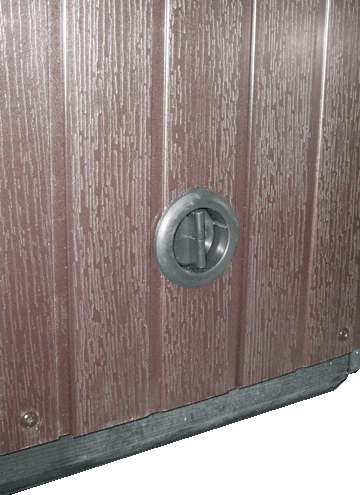
3. Pull the knob out about 2″ until it snaps into place.
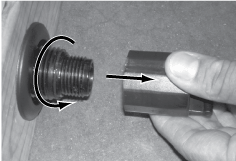
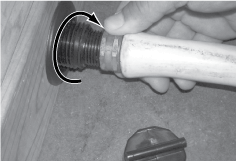
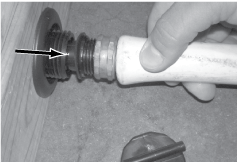
4. Unscrew the cap.
5. Hook up the female end of a garden hose to the drain fitting.
6. Place the other end of the garden hose where you would like the water to drain to.
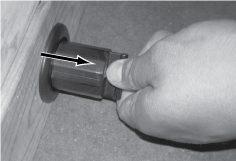
7. Pull the hose outward about ½” to start water flow. Push inward to shut off water flow.
8. Let spa drain completely.
9. Push the hose inward about ½ inch, then remove the garden hose.
10. Replace the cap.
11. Push the knob in about 2″ until it snaps back into place.
FOR SPAS WITH DRAIN INSIDE THE SPA:
1. Turn off the power at the breaker.
2. Remove all filters.
3. Using a Phillips screwdriver, remove the screws from the access panel and open it.
4. Locate hose ending with the ¾ inch hose-bib fixture.
5. Unscrew the cap.
6. Hook up the female end of a garden hose to the drain fitting.
7. Place the other end of the garden hose where you would like the water to drain to.
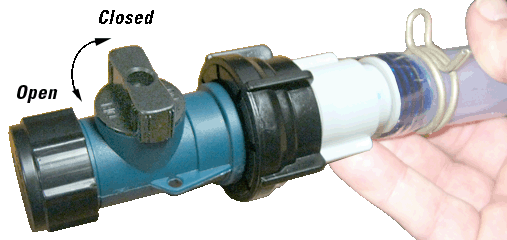
8. Turn the valve on the hose-bib fixture to open the drain.
9. Let spa drain completely, then remove garden hose.
10. Turn the valve on the hose-bib fixture to close the drain.
11. Replace the cap.
card first 1Winterizing Your Hot Tub
In many areas of the country, the temperature drops below 32°F (0°C). We recommend that you always have your spa full of water and running at normal spa temperatures (80°F to 100°F, 26.7°C to 37.8°C). This will help reduce the risk of freezing in your spa and your spa’s equipment.
1. Open all filter covers.
2. Remove the filter baskets and filters.
3. Drain your spa completely as described in the instructions above.
4. Vacuum water from the spa’s main drain fitting with a wet/dry vacuum.
3. Remove drain plugs from the front of the pumps.
5. Disconnect the unions from both sides of the pump.
6. Blow any remaining water out of the jets and equipment area with the wet/dry vacuum.
7. Cover your spa with a good spa cover and an all-weather tarp to ensure that neither rain nor snow enters the spa
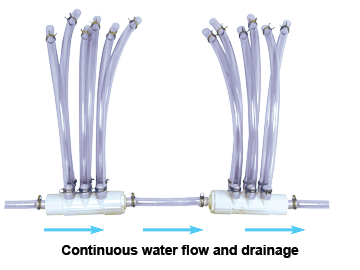
Note:: All manifolds are plumbed in series directly to the main drain (see example at right), making it easier to remove water and reducing the possibility of freeze damage.
Refilling Your Spa
Your spa should be drained every four to six months and refilled with fresh tap water. After you have drained your spa, refill it in this manner. Click here to learn how to drain the spa.
card first 1Cleaning The Spa Filter
WARNING!
Be sure to shut off the power of the spa before you remove the filter.
When the spa operates without a filter, there is a possibility that debris may be sucked into the plumbing through the filter well.
The filter is the part of your spa that removes the debris from the water and needs to be cleaned on a regular basis to maximize your spa’s filtering performance and heating efficiency.
We recommend you clean your filter about once a month, depending on your spa usage and bather load.
In addition to spraying off the filter weekly to remove surface debris, your filter should be deep-cleaned periodically to dissolve scales and particles that get lodged deep within the filter fibers and impede the filtration process. Even if the filter looks clean, scales and particles can clog the fibers and prevent water from flowing through the filter, resulting in the most common spa problem—no heat, caused by a dirty filter.
1. Remove the filter by turning it counterclockwise, unscrewing the bottom threads, then pulling it up and out.
2. Place the dirty filter into a bucket of water deep enough to cover the filter.
3. Add 8 oz of liquid filter cleaner to the bucket of water.
Note: It is a good idea to keep a spare filter to use in the spa while the dirty filter is being deep cleaned. This way, you can rotate the filters and both will last longer.
- Soak the filter for a minimum of 24 hours.
- Spray the filter with a water hose. Spray each pleat carefully.
- Reinstall the filter. Do not overtighten.
REPLACING THE FILTER
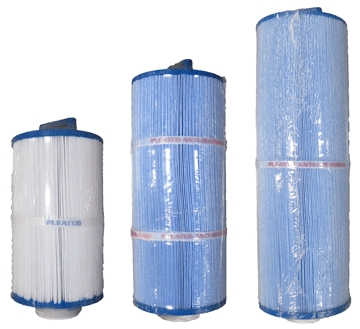
We recommend you replace your filter about once a year, depending on your spa usage and bather load. Before you place a new filter in your spa, make sure you remove the plastic wrapper. Soak the filter a minimum of 24 hours before you insert it in the filter well.
Never use a filter that is too small for your spa’s water capacity!
If you need a replacement filter visit Quick Spa Parts. 
Hot Tub Jet Removal & Replacement
Threaded jet inserts
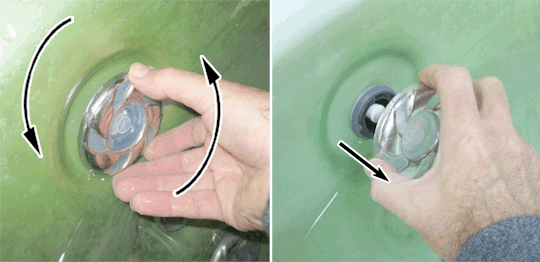
Rotate the jet face counterclockwise until you feel some resistance. Continue to rotate the jet until it begins to unscrew from the jet body.
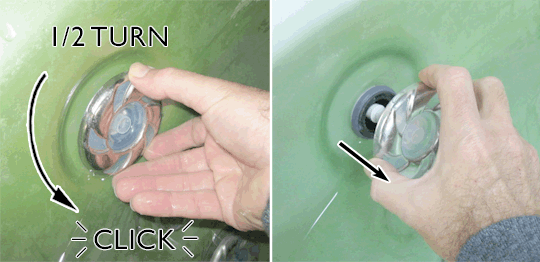
Replace jets by screwing them back into the jet body. When the jet face can be rotated by about a half turn without unscrewing the jet, it is properly in place. Do nog overtighten.
Snap-in jet inserts
Rotate the jet face counterclockwise until you feel some resistance.
Continue to rotate the jet for another quarter turn. You will feel the jet snap out of position. Continue to rotate the jet as you pull it out of the jet well.
To replace jets, insert the jet in the jet well and push and rotate it clockwise until you feel it snap into position. When the jet face can be rotated freely, it is properly seated.
card first 1Removing & Reseating The Pillows
You can remove the pillows for cleaning and maintenance quickly and easily.
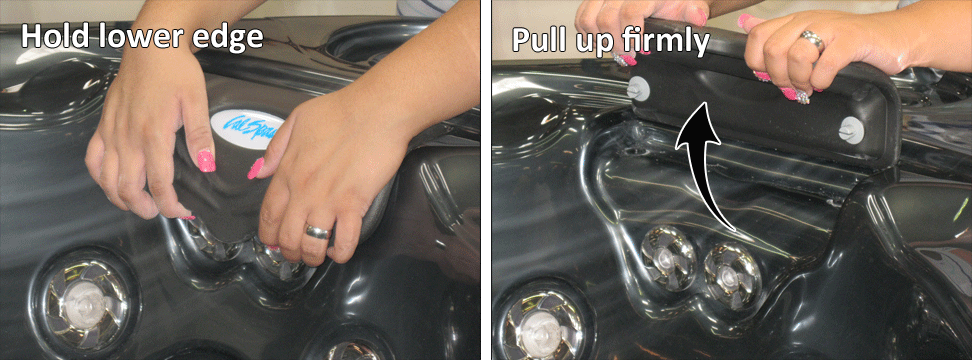
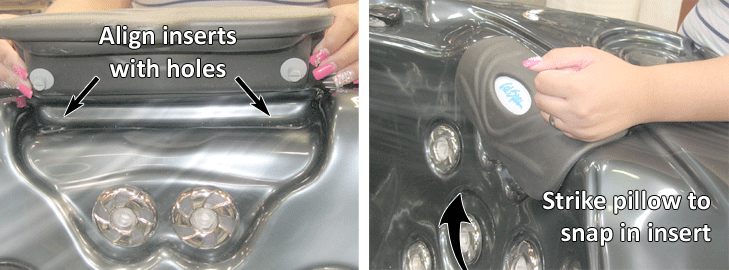
Grab the lower edge of the pillow firmly with both hands then pull up. As you do this, the pillow insert will pop out of the hole.
Reseat the pillow by aligning the pillow insert with the hole and striking the pillow hard enough to insert the peg back into the hole.
Removing the pillows can make it easier to clean and treat them. Click here to learn about cleaning pillows.
card first 1Cleaning & Treating Spa Cover & Pillows
Due to the constant punishment your pillows and cover receive, you should protect them by applying a vinyl and leather cleaner as part of your monthly maintenance plan. Use a product that is specifically designed to protect spa covers and pillows from chemical and ultraviolet light damage without leaving an oily residue behind that is normally associated with common automotive vinyl protectants.
Warning: Do not use automotive vinyl protectants on spa covers or pillows. These products are generally oil-based and will cause severe water clarity issues that are difficult to correct.
card first 1Cleaning & Polishing The Acrylic Surface
Each time you drain your spa, before you refill it you should clean your spa shell with an all-purpose cleaner and apply a coat of surface protectant. Use a low detergent, non-abrasive cleaner specifically formulated to clean the spa without damaging its acrylic finish.
USE A NON-OIL BASED surface protectant that is specifically formulated to protect the spa’s finish from the chemicals and minerals associated with normal spa use.
card first 1Keeping Your Spa Covered
KEEPING YOUR SPA COVERED WHEN NOT IN USE
Important: Keep your spa covered when not in use!
Your Cal Spas Hot Tub is a very important tool to maintain a healthy lifestyle, so we want to make sure you know how to prevent hiccups while owning a hot tub.
First thing’s first! Cover your Cal Spas and keep it protected from the sun, heat, and other outdoor elements. Furthermore, it helps reduce energy consumption, ultimately saving you money each month on your utility bill.
– Covered spas will use less electricity and maintain your set temperature.
– Investing in a good spa cover saves you money on your electric bill.
– Locking the spa cover insulates the water and maintains the heat
– Spa covers are a safety precaution for children and animals.
– Covering your spa will protect your spa’s finish from the sun’s ultraviolet rays.
– You are required to keep the spa covered to maintain warranty coverage.
– Spa covers help keep debris and outdoor elements out of your spa.
– Debris and outdoor elements tamper with your spa’s pH balance and filter—more of a reason to keep your spa covered!
– Heat damage will weaken the acrylic shell of the spa. Prevent the shell from cracking by keeping the lip of the spa fully covered.
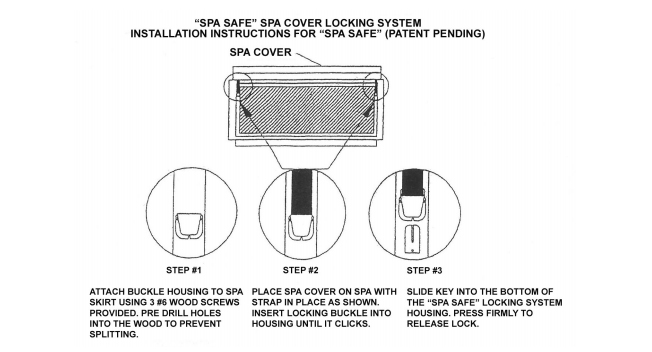
How to lock your spa cover:
In addition, while the spa cover is rigid, it is not designed to support any weight. Therefore, as a safety precaution and to preserve the life of your cover, you must not sit, stand, or lie on it, nor should you place objects of any kind on top of it.
If you need to replace your spa cover go to Quick Spa Parts – Covers
card first 1Cleaning & Repairing Spa Panels
HOT TUB PANEL MAINTENANCE
This applies to the three types of panels that are available for Cal Spa hot tubs:
– Cal Preferred™ standard panels.
– Cal Stone™ rock textured panels.
– Hercules™ polyurethane panels.
All cabinet panels are highly-durable, completely maintenance-free, weather-resistant, and flame-retardant. They will maintain their rich color for the years to come with the UV light inhibitors that are integrated into the cabinet’s construction.
Panels do not require much maintenance other than washing them periodically with a mild detergent and a sponge to keep them clean. You can spray off light dust and debris with a garden hose.
Spa panels are made of synthetic material, not wood, which means they do not need treatment to prevent discoloration. Normal wear and weathering to the finish will occur over time and are not considered defects.
card first 1Lates Spa Models
1. United States and Canada
1.1 2023 Portable Spa Owner’s Manual – ( Patio & Patio Plus)
1.2 2023 Escape & Platinum Spa Owner’s Manual – ( Escape & Platinum ) BALBOA
1.3 2023 Patio & Escape Spa Owner’s Manual – ( LAF )
1.4 2023 Special Edition Spa Owner’s Manual – (LAF)
1.5 Swim Spas
1.5.1 2023 Swim Spas Owner’s Manual – BALBOA/NEO
1.6 Pre-delivery guide
1.6.1 2023 Portable Spa Pre-Delivery Guide for US, Canada and Int‘l
1.6.2 2023 Portable Spa Pre-Delivery Guide for US, Canada, and Int‘l – French
2. Europe and International
2.1 2020 Portable Spa Owner’s Manual (INTL) – UK
2.2 2020 Portable Spa Owner’s Manual (INTL) – French
2.3 2020 Portable Spa Owner’s Manual (INTL) – German
2.4 2021 Portable Spa Owner’s Manual (INTL) – Norwegian
2.5 2020 Portable Spa Owner’s Manual (INTL) – Swedish
2.6 2019 Portable Spa Owner’s Manual (INTL) – Spanish
2.7 Pre-delivery guide
2.7.1 2020 – 2021 Portable Spa Pre-Delivery Guide for US, Canada and Int‘l
2.7.2 2020 Portable Spa Pre-Delivery Guide for US, Canada and Int‘l – French
2022 Spa Models
United States and Canada
1. 2022 Portable Spa Owner’s Manual – ( Patio & Patio Plus)
2. 2022 Platinum Spa Owner’s Manual – ( Escape & Platinum ) BALBOA
3. 2022 Special Edition Spa Owner’s Manual – (LES) NEO
4. Swim Spas
4.1. 2022 Swim Spas Owner’s Manual – BALBOA/NEO
5. Pre-delivery guide
5.1. 2022 Portable Spa Pre-Delivery Guide for US, Canada and Int‘l
card second 22021 Spa Models
United States and Canada
1. 2021 Portable Spa Owner’s Manual – ( Patio & Patio Plus)
2. 2021 Platinum Spa Owner’s Manual – ( Escape, Escape Plus & Platinum ) BALBOA
3. 2021 Platinum Spa Owner’s Manual – ( Escape, Escape Plus & Platinum ) NEO
4. 2021 Special Edition Spa Owner’s Manual – (LES) NEO
5. 2021 Special Edition Spa Owner’s Manual – BALBOA
6. 2021 Special Edition Spa Owner’s Manual – LA Fair
7. Swim Spas
7.1 2021 Swim Spas Owner’s Manual – BALBOA/NEO
8. Pre-delivery guide
8.1 2021 – 2021 Portable Spa Pre-Delivery Guide for US, Canada and Int‘l
Europe and International
1. 2021 Portable Spa Owner’s Manual (INTL) – UK
2. 2021 Portable Spa Owner’s Manual (INTL) – French
3. 2021 Portable Spa Owner’s Manual (INTL) – Norwegian
4. Pre-delivery guide
4.1. 2020 – 2021 Portable Spa Pre-Delivery Guide for US, Canada and Int‘l
2020 Spa Models
United States and Canada
1. 2020 Portable Spa Owner’s Manual – ( Patio & Patio Plus)
2. 2020 Platinum Spa Owner’s Manual – ( Escape, Escape Plus & Platinum ) BALBOA
3. 2020 Platinum Spa Owner’s Manual – ( Escape, Escape Plus & Platinum ) NEO
4. 2020 Special Edition Spa Owner’s Manual – (LES) NEO
5. 2020 Special Edition Spa Owner’s Manual – BALBOA
6. Swim Spas
6.1 2020 Swim Spas Owner’s Manual – BALBOA/NEO
7. Pre-delivery guide
7.1 2020 – 2021 Portable Spa Pre-Delivery Guide for US, Canada and Int‘l
7.2 2020 Portable Spa Pre-Delivery Guide for US, Canada, and Int‘l – French
Europe and International
1. 2020 Portable Spa Owner’s Manual (INTL) – UK
2. 2020 Portable Spa Owner’s Manual (INTL) – French
3. 2020 Portable Spa Owner’s Manual (INTL) – German
4. 2020 Portable Spa Owner’s Manual (INTL) – Norwegian
2020 Portable Spa Owner’s Manual (INTL) – Swedish
5. 2019 Portable Spa Owner’s Manual (INTL) – Spanish
6. Pre-delivery guide
6.1 2020 – 2021 Portable Spa Pre-Delivery Guide for US, Canada and Int‘l
6.2 2020 Portable Spa Pre-Delivery Guide for US, Canada and Int‘l – French
2019 Spa Models
United States and Canada
1. 2019 Portable Spa Owner’s Manual – Patio & Patio Plus
2. 2019 Platinum Spa Owner’s Manual – Escape & Platinum
3. 2019 Portable Spa Manual – Special Edition LESG
4. Swim Spas
4.1 2019 Swim Spas Owner’s Manual
5 Pre-delivery guide
5.1 2019 Portable Spa Pre-Delivery Guide for US, Canada, and International
5.2 2019 Portable Spa Pre-Delivery Guide for US, Canada, and International – French
Europe and International
1. 2019 Portable Spa Owner’s Manual (INTL) – UK
2. 2019 Portable Spa Owner’s Manual (INTL) – French
3. 2019 Portable Spa Owner’s Manual (INTL) – German
4. 2019 Portable Spa Owner’s Manual (INTL) – Norwegian
5. 2019 Portable Spa Owner’s Manual (INTL) – Swedish
6. 2019 Portable Spa Owner’s Manual (INTL) – Spanish
7. Pre-delivery guide
7.1 2019 Portable Spa Pre-Delivery Guide for US, Canada, and International
7.2 2019 Portable Spa Pre-Delivery Guide for US, Canada, and International – French
Older Spa Models
United States and Canada
1. 2018 Portable Spa Owner’s Manual (before 12/31/2018) USA & Canada
2. 2018 Platinum Spa Owner’s Manual (before 12/31/2018)
3. 2018 Swim Spa(Pro Trainer) Owner’s Manual (before 08/01/2018)
4. 2018 Portable Spa Owner’s Manual (before 07/26/2018)
5. 2018 Veranda Spa Owner’s Manual (before 07/26/2018)
6. 2018 Swim Spa(Neo Pack / Spa Touch / TP600U) Owner’s Manual (before 05/15/2018)
7. 2018 Swim Spa(Pro Trainer) Owner’s Manual (before 07/26/2018)
8. 2018 Platinum Spa Owner’s Manual (before 07/26/2018)
9. 2018 Portable Spa Owner’s Manual (before 05/15/2018)
10. 2018 Veranda Spa Owner’s Manual (before 05/15/2018)
11. 2018 Swim Spa(Neo Pack / Spa Touch / TP600U) Owner’s Manual (before 05/15/2018)
12. 2018 Swim Spa(Pro Trainer) Owner’s Manual (before 05/15/2018)
13. 2018 Platinum Spa Owner’s Manual (before 05/15/2018)
14. 2017 Swim Spa Owner’s Manual
15. 2017 Portable Spa Owner’s Manual
16. 2017 Inground Spa Owners Manual predelivery
17. 2017 Platinum Series Spa Owner’s Manual
18. 2017 Veranda Spas Owner’s Manual
19. 2017 Fitness Spa Pro Swim Owner’s Manual
20. 2016 Portable Spa Owner’s Manual –USA & Canada
21. 2016 Swim Spa Owner’s Manual
22. 2016 Platinum Spa Owner’s Manual
23. 2016 Fitness Spa Pro Swim System Owner’s Manual
25. 2015 Portable Spa Owner’s Manual –USA & Canada
26. 2015 Guide d’utilisation pour Spas Portables, aux États Unis & au Canada
27. 2015 Swim Spa Owner’s Manual
28. 2015 Platinum Spa Owner’s Manual
29. 2015 Portable Spa Pre-Delivery Guide for US, Canada, and International
30. 2015 Portable Spa Pre-Delivery Guide for US, Canada, and International
31. 2014 Portable Spa Owner’s Manual –
32. 2014 Portable spa owner’s manual (Canada only)
33. 2014 Owner’s Manual – Aqua, LES, & Special Edition Spas
34. 2013 Portable Spa Owner’s Manual
37. 2010 Portable Spas (built between 5/20/10 and 12/31/10)
38. 2010 Portable Spas (built between 3/1/10 and 5/19/10)
39. 2010 Portable Spas (built between 11/19/09 and 2/28/10)
40. 2009 Portable Spas, All Models (Except Genesis)
41. 2008 Portable Spas, All Models
42. 2007 Portable Spas, img-responsivetimate to Xtreme
43. 2007 Portable Spa, Family Fun
46. 2006 Portable Spas, Galaxy to Family Fun
50. 2003 Portable Spa, Journey Series
51. 2003 Portable Spa, Victory Series
55. 1999 Spas, Pneumatic and Electronic II and III
56. 1999 Portable Spas, Fiesta and Genesis Series
57. 1999 Portable Spas, Premier and System Series
58. 1998 Portable Spas, Fiesta and Pneumatic Controls
59. 1998 Portable Spas, Premier Series
60. 1998 Portable Spas, System Series
61. 1997 Portable Spas, Pneumatic Controls
62. 1997 Portable Spas, Genesis Series
64. 1997 Portable Spas, Premier Series
65. 1997 Portable Spas, System Series
70. 1992 Portable and Inground Spas
71. 1991 Portable and Inground Spas
72. 1990 Portable and Inground Spas
73. 1989 Portable and Inground Spas
74. 1988 Portable and Inground Spas
76. 1986 Portable and Inground Spas
French language manuals for Canada
1. 2016 Guide d’utilisation pour spas portables
2. 2016 Guide de pré-livraison pour les spas portables
3. 2014 Guide d’utilisation pour spas portables
4. 2013 Guide d’utilisation pour spas portables
5. 2012 Guide d’utilisation pour spas portables
6. 2011 Guide d’utilisation pour spas portables
7. 2010 Guide d’utilisation pour spas portables (built between 5/20/10 and 12/31/10)
8. 2010 Guide d’utilisation pour spas portables (built between 3/1/10 and 5/19/10)
9. 2010 Guide d’utilisation pour spas portables (built between 11/19/09 and 2/28/10)
10. 2009 Guide d’utilisation pour spas portables
11. 2008 Guide d’utilisation pour spas portables
12. 2007 Guide d’utilisation pour spas portables
13. 2006 Guide d’utilisation pour spas portables
14. 2005 Guide d’utilisation pour spas portables
15. 2004 Guide d’utilisation pour spas portables
16. 2003 Guide d’utilisation pour spas portables
Older European and international manuals
1. 2018 Portable Spa Owner’s Manual (INTL) – UK
2. 2018 Portable Spa Owner’s Manual (INTL) – German
3. 2018 Portable Spa Owner’s Manual (INTL) – Swedish
4. 2018 Portable Spa Owner’s Manual (INTL) – Spanish
5. 2018 Portable Spa Owner’s Manual (INTL before 08/01/2018) – English
6. 2018 Portable Spa Owner’s Manual (INTL before 05/15/2018) – English
7. 2018 Portable Spa Owner’s Manual (INTL before 05/15/2018) – French
8. 2018 Portable Spa Owner’s Manual (INTL before 05/15/2018) – German
9. 2018 Portable Spa Owner’s Manual (INTL before 05/15/2018) – Norwegian
10. 2018 Portable Spa Owner’s Manual (INTL before 05/15/2018) – Swedish
11. 2018 Portable Spa Owner’s Manual (INTL before 05/15/2018) – Spanish
12. 2016 Portable Spa Owner’s Manual (INTL) – English
13. 2016 Portable Spa Owner’s Manual (INTL) – French
14. 2016 Portable Spa Owner’s Manual (INTL) – Dutch
15. 2015 Portable Spa Owner’s Manual (INTL) – English
16. 2015 Portable Spa Owner’s Manual (INTL) – French
17. 2015 Portable Spa Owner’s Manual (INTL) – Dutch
18. 2015 Portable Spa Owner’s Manual Australia and New Zealand
19. 2015 Portable Spa Pre-Delivery Guide for US, Canada, and International
20. 2015 Portable Spa Pre-Delivery Guide for US, Canada, and International
21. 2014 Portable Spa Owner’s Manual (INTL) ENGLISH
22. 2014 Portable Spa Owner’s Manual (INTL) FRENCH
23. 2013 Portable Spa Owner’s Manual (INTL) ENGLISH
24. 2013 Portable Spa Owner’s Manual (INTL) FRENCH
25. 2012 Portable Spas (Europe) – English, French, Dutch, German, Spanish, Norwegian)
26. 2011 Portable Spa Manual (Europe) – English, French, Dutch, German, Spanish, Norwegian
27. 2010 Portable Spas (Europe) – English, French, Dutch, German, Spanish, Norwegian
28. 2009 Portable Spas (Europe) – English, French, Dutch, German, Spanish, Norwegian
29. 2008 Portable Spas (Europe) – English, French, Dutch, German, Spanish, Norwegian
30. 2007 Portable Spas (Europe) – English, French, German, Spanish, Norwegian
31. 2006 Portable Spas (Europe) – English, French, German, Spanish
32. 2005 Portable Spas (Europe) – English only
33. 2004 Portable Spas (Europe) – English only
34. 1999 Fiesta, Genesis, Premier and System Line spa owner’s manual (Europe) – English only
35. 1999 Genesis, Premier and System Line spa owner’s manual (Europe) – English only
Discontinued models
Note: The Genesis manuals listed below are for an acrylic spa sold from 2009-2011. For roto mold spa manuals, see the section further down on this page.
1. 2018 Swim Spa(Pro Trainer) Owner’s Manual
2. 2018 Veranda Spa Owner’s Manual – USA & Canada
6. Rejuvenation Spas Fountain of Youth Owner’s Manual
Rotomold Spas
US, Canada, and International
For roto mold spas built from January 2015
1. Genesis Rotomold Spa Owner’s Manual
For roto mold spas built in 2012 to 2014
1. Genesis Rotomold Spa Owner’s Manual
2. Genesis Rotomold Spa Owner’s Manual
3. Roto Spa Pre-delivery Guide
card second 2Hot Tub Water Quality
KEEPING YOUR SPA WATER CLEAR AND FRESH
Important: Keep the spa covered when not in use!
This information is for new spa owners with no experience with water chemistry. Everyone’s experience with maintaining water quality is different, but there are some general concepts you need to know.
Water maintenance is not difficult, although it requires regular attention. The most important thing to understand about taking care of your spa water is that preventive action is much easier than correcting water quality issues.
Excellent water quality is a simple matter of four things:
1. Chemical Balance
You will need to test and adjust the chemical balance of your spa water. Although this is not difficult, it needs to be done regularly. Depending on your choice of sanitizer, you need to test the level of calcium hardness, total alkalinity, and pH level. Spa owners with a Cal Clarity II bromine generator also need to check total dissolved solids and phosphates.
Click here to learn how to balance your water chemistry.
2. Sanitation
Sanitizers kill bacteria and viruses and keep the water clean. A low sanitizer level will allow microbes to grow quickly in the spa water. We recommend using either chlorine or bromine as your sanitizer.
Spa owners with an ozonator or the Pure Cure system also need to add sanitizer, although their requirements are different.
Learn how to use sanitizers here
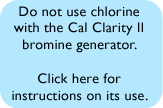
The Cal Clarity II bromine generator can NOT be used with chlorine. Click here to learn how it is used.
3. Filtration
Cleaning your filter regularly is the easiest and most effective single thing you can do to keep your water clear. A clogged or dirty filter will cause the heater and pump to work harder than they need to, possibly causing them to fail.
The spa’s heating system will only function with the proper amount of water flow through the system.
Click here for filter cleaning instructions.
4. Regularity
Clear water requires regular maintenance. Establish a routine based on a regular schedule for your spa water maintenance.
Maintaining your water quality helps the enjoyment of your spa and extends your spa’s life by preventing damage from neglect and chemical abuse.
Testing Water
HOT TUB CHEMICAL BALANCE
When testing and adjusting spa water, you have two types of testing methods to choose from:
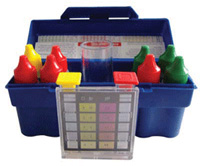
The Reagent Test Kit:
is a method which provides a high level of accuracy. It is available in either liquid or tablet form.
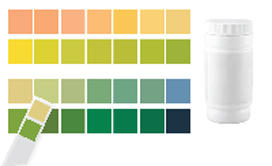
Test strips:
are a convenient testing method commonly used by spa owners.
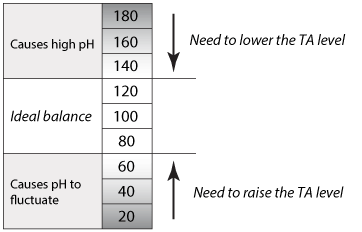
TA Scale
BALANCING THE TOTAL ALKALINITY
Total Alkalinity (TA) is the measure of the total levels of carbonates, bicarbonates, hydroxides, and other alkaline substances in the water. TA can considered a “pH buffer”. It is the measure of the ability of the water to resist changes in pH level.
The recommended total alkalinity is 80 – 120 ppm.
If the TA is too low, the pH level will fluctuate widely from high to low. Low TA can be corrected by adding an alkalinity increaser.
If the TA is too high, the pH level will tend to be too high and may be difficult to bring down. High TA can be corrected by adding an alkalinity decreaser.
When the TA is balanced, it normally remains stable. Although adding water with high or low alkalinity will raise or lower the TA level.
CH Scale
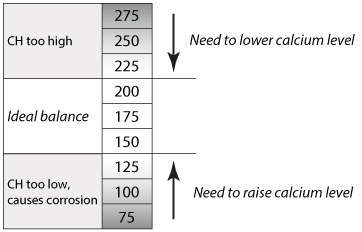
BALANCING THE CALCIUM HARDNESS
Calcium Hardness (CH) is a measure of the total amount of dissolved calcium in the water. Calcium helps control the corrosive nature of the spa’s water and is why soft water is not recommended. The low calcium content of soft water is very corrosive to the equipment and can cause staining of the spa shell.
The recommended calcium hardness is 150 – 200 ppm.
If the CH is too low, add a calcium hardness increaser.
If the CH is too high, dilute the spa water with soft water.
When the CH is balanced, it normally remains stable, although adding soft water or very hard water will raise or lower the CH level.
pH Scale
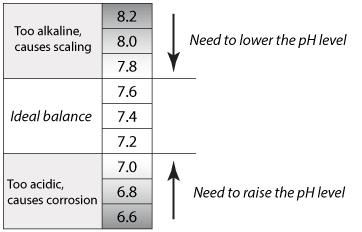
BALANCING THE PH
The pH level is the measure of the balance between acidity and alkalinity.
The recommended pH level is 7.2 to 7.6.
If the pH is too low, it can cause corrosion of metal fixtures and the heating element. Low pH can be corrected by adding a pH increaser.
If the pH is too high, it can cause scaling by allowing metals or minerals to form deposits and stain spa surfaces. High pH can be corrected by adding a pH decreaser.
When the CH is balanced, it normally remains stable, although adding soft water or very hard water will raise or lower the CH level.
Hot Tub Sanitation
Sanitizers kill bacteria and other organic waste by breaking them down to non-harmful levels and are filtered out. Before you fill your spa, you need to decide which chemical sanitizer you wish to use. Consult your Cal Spas dealer for the right decision with regards to your lifestyle and spa usage. We recommend either bromine or chlorine as your sanitizer. Both work well when maintained regularly.
DO NOT use trichlor. Trichlor is very acidic and the hot temperature of the spa causes it to dissolve too quickly. It will cause damage to your spa and will void your warranty.
Whichever plan you decide on, follow it completely and don’t take shortcuts. It will provide you with clean, safe, and clear spa water with only minimal effort. Spa owners with an ozonator will still need to use a chemical sanitizer.
Using Chlorine as a Sanitizer
If you choose to use chlorine as a sanitizer, only use granulated chlorine, not liquid chlorine.
Once a week, check the chlorine level using either a test strip or a reagent kit. See the table on the following page for the ideal range.
Add one or two tablespoons granulated chlorine to the spa water weekly. Note that chlorine dissipation rate will be faster at higher water temperatures and slower at lower temperatures.
When you add chlorine, open all of the jets and run the spa at high speed with the cover open for at least 30 minutes.
Follow the maintenance schedule.
Using Bromine as a Sanitizer
Bromine is a very effective sanitizer that produces low chemical odors. Unlike chlorine, it can break down bacteria and other impurities to a safe level with a low burn-out rate.
Bromine is available in granulated form. Use granulated sodium bromide to establish your bromine base.
When you begin with fresh water, add 2 ounces of granulated bromide. Open all of the jets and run the spa at high speed with the cover open for at least 30 minutes. This is your base bromine level.
Follow the maintenance schedule.
Shocking the Water
In addition to using a chemical sanitizer, you will periodically need to shock the water. Shocking the water helps remove burned-out chemicals, bacteria, and other organic material from your spa’s water and improves your sanitizer’s effectiveness.
Do not use chlorinating shock, which will damage your spa’s jets and pump seals. Only use an oxidizer shock. It can be used with either chlorine or bromine sanitizers.
Add two ounces of oxidizer shock per 500 gallons once a week, after heavy bather loads, or if water has a strong odor.
Spa must be running with all of the jets on high for 30 minutes with the cover open. If necessary, repeat oxidizer shock in 30 minute intervals.
card third3Cleaning The Spa Filter
WARNING!
Be sure to shut off power to the spa before you remove the filter.
When the spa operates without a filter, there is a possibility that debris may be sucked into the plumbing through the filter well.
The filter is the part of your spa that removes the debris from the water and needs to be cleaned on a regular basis to maximize your spa’s filtering performance and heating efficiency.
We recommend you clean your filter about once a month, depending on your spa usage and bather load.
In addition to spraying off the filter weekly to remove surface debris, your filter should be deep cleaned periodically to dissolve scale and particles that get lodged deep within the filter fibers and impede the filtration process. Even if the filter looks clean, scale and particles can clog the fibers and prevent water from flowing through the filter resulting in the most common spa problem—no heat, caused by a dirty filter.
- Remove the filter by turning it counterclockwise, unscrewing the bottom threads, then pulling it up and out.
- Place the dirty filter into a bucket of water deep enough to cover the filter.
- Add 8 oz of liquid filter cleaner to the bucket of water.
Note: It is a good idea to keep a spare filter to use in the spa while the dirty filter is being deep cleaned. This way, you can rotate the filters and both will last longer.
- Soak the filter for a minimum of 24 hours.
- Spray the filter with a water hose. Spray each pleat carefully.
- Reinstall the filter. Do not overtighten.
REPLACING THE FILTER
We recommend you replace your filter about once a year, depending on your spa usage and bather load. Before you place a new filter in your spa, make sure you remove the plastic wrapper. Soak the filter a minimum of 24 hours before you insert it in the filter well.
Never use a filter too small for your spa’s water capacity!
If you need a replacement filter visit http://quickspaparts.com. 
If you are experiencing a problem with your spa, before you call Customer Service, you may be able to resolve it yourself by following these troubleshooting steps.
There are many problems spa owners can identify and resolve themselves. This troubleshooting guide will help you with many common problems and may save you a service call. We don’t expect spa owners to be technicians, so everything contained in this guide is non-technical and does not involve tools. You will never be asked to do something that will void your warranty. You may not be able to resolve every problem your spa may have. When that happens, you will be advised to call for service.
If your spa is under warranty, you must have all service performed by a qualified spa service tech or you will void your warranty.
Before you make repairs to your spa, check that it’s still under warranty. If it is, and it’s a part that’s covered by the warranty, you should call your spa dealer to schedule service. Some parts are not covered under the warranty, particularly wearable parts such as jet inserts and lights. For more information on what parts are covered by the warranty, refer to the spa warranties page on this site.
Message on the control panel
1. A message on the control panel may indicate a problem.
Note: The message troubleshooting shown here applies to Cal Spa control panels built in 2013 and earlier. Beginning with the 2014 product line, Cal Spa control panels display different message codes. For a description of these message codes, see the owner’s manual.
Problems starting up
Note: The priming procedure described here applies to Cal Spas built in 2013 and earlier. Beginning with the 2014 product line, Cal Spas pumps have a different method of priming. See the 2014 owner’s manual for a full description.
Power and electrical problems
3. Control panel doesn’t respond
4. Spa uses too much electricity (very high power bills)
Note: The priming procedure described here applies to Cal Spas built in 2013 and earlier. Beginning with the 2014 product line, Cal Spas pumps have a different method of priming. See the 2014 owner’s manual for a full description.
Heat problems
Jet problems
Water pressure problems
1. ow water pressure throughout spa
2. Some jets have low or no pressure
3. No water pressure throughout spa
Pump problems
1. Pump is very noisy when it runs
2.
3. Pump has a burning smell while running
Air stream problems
1. No air bubbles when valve is opened
Water quality problems
texto first 15Keep your spa clean and well-maintained, and you will enjoy years of enjoyment relaxing in your spa. Learn about common tasks involved in spa ownership.
Daily
Weekly and before each use
2. Click here to learn more about maintaining your water quality.
Monthly
1. Deep clean your spa’s filter.
Every two to four months
Change the spa water. How often you change the water depends on how much you use the spa. When you change the water, you will need to:
3. Refill your spa with fresh water.
Once a year
As needed
1. Clean and polish the acrylic surface.
2. Clean and treat the spa cover and pillows.
3. Spa panel maintenance and repair
4. Winterizing (draining for cold climate)
texto first 16You can leave your spa unattended for up to two weeks if you follow these instructions:
1. Set the spa to Sleep Mode. (See your owner’s manual for changing modes.)
2. Adjust the pH. See instructions on water quality.
3. Shock the water (add either chlorine or bromine sanitizer).See instructions on shocking the water.
4. When you return, check and adjust the pH and shock the water.
5. If you will not be using your spa for longer than 14 days and a spa maintenance service is not available, we strongly recommend you drain or winterize your spa.
ALWAYS lock your cover using the cover locks if you plan to be away from home and the spa is filled with water.
Click here to learn how to drain your spa.
Click here to learn how to winterize your spa.
texto first 17Your spa should be drained every four to six months and refilled with fresh tap water. The following are recommended methods for draining your spa:
Do not open the control box. These instructions contain only basic guidance for this problem. Anything beyond the scope of these instructions should be performed by a qualified spa technician or an electrician.
FOR SPAS WITH CABINET-MOUNTED DRAIN:
1. Turn off the power at the breaker.
2. Remove all filters.
3. Pull the knob out about 2″ until it snaps into place.
4. Unscrew the cap.
5. Hook up the female end of a garden hose to the drain fitting.
6. Place the other end of the garden hose where you would like the water to drain to.
7. Pull the hose outward about ½” to start water flow. Push inward to shut off water flow.
8. Let spa drain completely.
9. Push the hose inward about ½ inch, then remove the garden hose.
10. Replace the cap.
11. Push the knob in about 2″ until it snaps back into place.
FOR SPAS WITH DRAIN INSIDE THE SPA:
1. Turn off the power at the breaker.
2. Remove all filters.
3. Using a Phillips screwdriver, remove the screws from the access panel and open it.
4. Locate hose ending with the ¾ inch hose-bib fixture.
5. Unscrew the cap.
6. Hook up the female end of a garden hose to the drain fitting.
7. Place the other end of the garden hose where you would like the water to drain to.
8. Turn the valve on the hose-bib fixture to open the drain.
9. Let spa drain completely, then remove garden hose.
10. Turn the valve on the hose-bib fixture to close the drain.
11. Replace the cap.
texto first 18In many areas of the country, the temperature drops below 32°F (0°C). We recommend that you always have your spa full of water and running at normal spa temperatures (80°F to 100°F, 26.7°C to 37.8°C). This will help reduce the risk of freezing in your spa and your spa’s equipment.
1. Open all filter covers.
2. Remove the filter baskets and filters.
3. Drain your spa completely as described in the instructions above.
4. Vacuum water from the spa’s main drain fitting with a wet/dry vacuum.
3. Remove drain plugs from the front of the pumps.
5. Disconnect the unions from both sides of the pump.
6. Blow any remaining water out of the jets and equipment area with the wet/dry vacuum.
7. Cover your spa with a good spa cover and an all-weather tarp to ensure that neither rain nor snow enters the spa
Note:: All manifolds are plumbed in series directly to the main drain (see example at right), making it easier to remove water and reducing the possibility of freeze damage.
Your spa should be drained every four to six months and refilled with fresh tap water. After you have drained your spa, refill it in this manner. Click here to learn how to drain the spa.
texto first 20WARNING!
Be sure to shut off the power of the spa before you remove the filter.
When the spa operates without a filter, there is a possibility that debris may be sucked into the plumbing through the filter well.
The filter is the part of your spa that removes the debris from the water and needs to be cleaned on a regular basis to maximize your spa’s filtering performance and heating efficiency.
We recommend you clean your filter about once a month, depending on your spa usage and bather load.
In addition to spraying off the filter weekly to remove surface debris, your filter should be deep-cleaned periodically to dissolve scales and particles that get lodged deep within the filter fibers and impede the filtration process. Even if the filter looks clean, scales and particles can clog the fibers and prevent water from flowing through the filter, resulting in the most common spa problem—no heat, caused by a dirty filter.
1. Remove the filter by turning it counterclockwise, unscrewing the bottom threads, then pulling it up and out.
2. Place the dirty filter into a bucket of water deep enough to cover the filter.
3. Add 8 oz of liquid filter cleaner to the bucket of water.
Note: It is a good idea to keep a spare filter to use in the spa while the dirty filter is being deep cleaned. This way, you can rotate the filters and both will last longer.
- Soak the filter for a minimum of 24 hours.
- Spray the filter with a water hose. Spray each pleat carefully.
- Reinstall the filter. Do not overtighten.
REPLACING THE FILTER
We recommend you replace your filter about once a year, depending on your spa usage and bather load. Before you place a new filter in your spa, make sure you remove the plastic wrapper. Soak the filter a minimum of 24 hours before you insert it in the filter well.
Never use a filter that is too small for your spa’s water capacity!
If you need a replacement filter visit Quick Spa Parts. 
Threaded jet inserts
Rotate the jet face counterclockwise until you feel some resistance. Continue to rotate the jet until it begins to unscrew from the jet body.
Replace jets by screwing them back into the jet body. When the jet face can be rotated by about a half turn without unscrewing the jet, it is properly in place. Do nog overtighten.
Snap-in jet inserts
Rotate the jet face counterclockwise until you feel some resistance.
Continue to rotate the jet for another quarter turn. You will feel the jet snap out of position. Continue to rotate the jet as you pull it out of the jet well.
To replace jets, insert the jet in the jet well and push and rotate it clockwise until you feel it snap into position. When the jet face can be rotated freely, it is properly seated.
texto first 22You can remove the pillows for cleaning and maintenance quickly and easily.
Grab the lower edge of the pillow firmly with both hands then pull up. As you do this, the pillow insert will pop out of the hole.
Reseat the pillow by aligning the pillow insert with the hole and striking the pillow hard enough to insert the peg back into the hole.
Removing the pillows can make it easier to clean and treat them. Click here to learn about cleaning pillows.
texto first 23Due to the constant punishment your pillows and cover receive, you should protect them by applying a vinyl and leather cleaner as part of your monthly maintenance plan. Use a product that is specifically designed to protect spa covers and pillows from chemical and ultraviolet light damage without leaving an oily residue behind that is normally associated with common automotive vinyl protectants.
Warning: Do not use automotive vinyl protectants on spa covers or pillows. These products are generally oil-based and will cause severe water clarity issues that are difficult to correct.
texto first 24Each time you drain your spa, before you refill it you should clean your spa shell with an all-purpose cleaner and apply a coat of surface protectant. Use a low detergent, non-abrasive cleaner specifically formulated to clean the spa without damaging its acrylic finish.
USE A NON-OIL BASED surface protectant that is specifically formulated to protect the spa’s finish from the chemicals and minerals associated with normal spa use.
texto first 25KEEPING YOUR SPA COVERED WHEN NOT IN USE
Important: Keep your spa covered when not in use!
Your Cal Spas Hot Tub is a very important tool to maintain a healthy lifestyle, so we want to make sure you know how to prevent hiccups while owning a hot tub.
First thing’s first! Cover your Cal Spas and keep it protected from the sun, heat, and other outdoor elements. Furthermore, it helps reduce energy consumption, ultimately saving you money each month on your utility bill.
– Covered spas will use less electricity and maintain your set temperature.
– Investing in a good spa cover saves you money on your electric bill.
– Locking the spa cover insulates the water and maintains the heat
– Spa covers are a safety precaution for children and animals.
– Covering your spa will protect your spa’s finish from the sun’s ultraviolet rays.
– You are required to keep the spa covered to maintain warranty coverage.
– Spa covers help keep debris and outdoor elements out of your spa.
– Debris and outdoor elements tamper with your spa’s pH balance and filter—more of a reason to keep your spa covered!
– Heat damage will weaken the acrylic shell of the spa. Prevent the shell from cracking by keeping the lip of the spa fully covered.
How to lock your spa cover:
In addition, while the spa cover is rigid, it is not designed to support any weight. Therefore, as a safety precaution and to preserve the life of your cover, you must not sit, stand, or lie on it, nor should you place objects of any kind on top of it.
If you need to replace your spa cover go to Quick Spa Parts – Covers
texto first 26HOT TUB PANEL MAINTENANCE
This applies to the three types of panels that are available for Cal Spa hot tubs:
– Cal Preferred™ standard panels.
– Cal Stone™ rock textured panels.
– Hercules™ polyurethane panels.
All cabinet panels are highly-durable, completely maintenance-free, weather-resistant, and flame-retardant. They will maintain their rich color for the years to come with the UV light inhibitors that are integrated into the cabinet’s construction.
Panels do not require much maintenance other than washing them periodically with a mild detergent and a sponge to keep them clean. You can spray off light dust and debris with a garden hose.
Spa panels are made of synthetic material, not wood, which means they do not need treatment to prevent discoloration. Normal wear and weathering to the finish will occur over time and are not considered defects.
texto first 271. United States and Canada
1.1 2023 Portable Spa Owner’s Manual – ( Patio & Patio Plus)
1.2 2023 Escape & Platinum Spa Owner’s Manual – ( Escape & Platinum ) BALBOA
1.3 2023 Patio & Escape Spa Owner’s Manual – ( LAF )
1.4 2023 Special Edition Spa Owner’s Manual – (LAF)
1.5 Swim Spas
1.5.1 2023 Swim Spas Owner’s Manual – BALBOA/NEO
1.6 Pre-delivery guide
1.6.1 2023 Portable Spa Pre-Delivery Guide for US, Canada and Int‘l
1.6.2 2023 Portable Spa Pre-Delivery Guide for US, Canada, and Int‘l – French
2. Europe and International
2.1 2020 Portable Spa Owner’s Manual (INTL) – UK
2.2 2020 Portable Spa Owner’s Manual (INTL) – French
2.3 2020 Portable Spa Owner’s Manual (INTL) – German
2.4 2021 Portable Spa Owner’s Manual (INTL) – Norwegian
2.5 2020 Portable Spa Owner’s Manual (INTL) – Swedish
2.6 2019 Portable Spa Owner’s Manual (INTL) – Spanish
2.7 Pre-delivery guide
2.7.1 2020 – 2021 Portable Spa Pre-Delivery Guide for US, Canada and Int‘l
2.7.2 2020 Portable Spa Pre-Delivery Guide for US, Canada and Int‘l – French
United States and Canada
1. 2022 Portable Spa Owner’s Manual – ( Patio & Patio Plus)
2. 2022 Platinum Spa Owner’s Manual – ( Escape & Platinum ) BALBOA
3. 2022 Special Edition Spa Owner’s Manual – (LES) NEO
4. Swim Spas
4.1. 2022 Swim Spas Owner’s Manual – BALBOA/NEO
5. Pre-delivery guide
5.1. 2022 Portable Spa Pre-Delivery Guide for US, Canada and Int‘l
texto second 31United States and Canada
1. 2021 Portable Spa Owner’s Manual – ( Patio & Patio Plus)
2. 2021 Platinum Spa Owner’s Manual – ( Escape, Escape Plus & Platinum ) BALBOA
3. 2021 Platinum Spa Owner’s Manual – ( Escape, Escape Plus & Platinum ) NEO
4. 2021 Special Edition Spa Owner’s Manual – (LES) NEO
5. 2021 Special Edition Spa Owner’s Manual – BALBOA
6. 2021 Special Edition Spa Owner’s Manual – LA Fair
7. Swim Spas
7.1 2021 Swim Spas Owner’s Manual – BALBOA/NEO
8. Pre-delivery guide
8.1 2021 – 2021 Portable Spa Pre-Delivery Guide for US, Canada and Int‘l
Europe and International
1. 2021 Portable Spa Owner’s Manual (INTL) – UK
2. 2021 Portable Spa Owner’s Manual (INTL) – French
3. 2021 Portable Spa Owner’s Manual (INTL) – Norwegian
4. Pre-delivery guide
4.1. 2020 – 2021 Portable Spa Pre-Delivery Guide for US, Canada and Int‘l
United States and Canada
1. 2020 Portable Spa Owner’s Manual – ( Patio & Patio Plus)
2. 2020 Platinum Spa Owner’s Manual – ( Escape, Escape Plus & Platinum ) BALBOA
3. 2020 Platinum Spa Owner’s Manual – ( Escape, Escape Plus & Platinum ) NEO
4. 2020 Special Edition Spa Owner’s Manual – (LES) NEO
5. 2020 Special Edition Spa Owner’s Manual – BALBOA
6. Swim Spas
6.1 2020 Swim Spas Owner’s Manual – BALBOA/NEO
7. Pre-delivery guide
7.1 2020 – 2021 Portable Spa Pre-Delivery Guide for US, Canada and Int‘l
7.2 2020 Portable Spa Pre-Delivery Guide for US, Canada, and Int‘l – French
Europe and International
1. 2020 Portable Spa Owner’s Manual (INTL) – UK
2. 2020 Portable Spa Owner’s Manual (INTL) – French
3. 2020 Portable Spa Owner’s Manual (INTL) – German
4. 2020 Portable Spa Owner’s Manual (INTL) – Norwegian
2020 Portable Spa Owner’s Manual (INTL) – Swedish
5. 2019 Portable Spa Owner’s Manual (INTL) – Spanish
6. Pre-delivery guide
6.1 2020 – 2021 Portable Spa Pre-Delivery Guide for US, Canada and Int‘l
6.2 2020 Portable Spa Pre-Delivery Guide for US, Canada and Int‘l – French
United States and Canada
1. 2019 Portable Spa Owner’s Manual – Patio & Patio Plus
2. 2019 Platinum Spa Owner’s Manual – Escape & Platinum
3. 2019 Portable Spa Manual – Special Edition LESG
4. Swim Spas
4.1 2019 Swim Spas Owner’s Manual
5 Pre-delivery guide
5.1 2019 Portable Spa Pre-Delivery Guide for US, Canada, and International
5.2 2019 Portable Spa Pre-Delivery Guide for US, Canada, and International – French
Europe and International
1. 2019 Portable Spa Owner’s Manual (INTL) – UK
2. 2019 Portable Spa Owner’s Manual (INTL) – French
3. 2019 Portable Spa Owner’s Manual (INTL) – German
4. 2019 Portable Spa Owner’s Manual (INTL) – Norwegian
5. 2019 Portable Spa Owner’s Manual (INTL) – Swedish
6. 2019 Portable Spa Owner’s Manual (INTL) – Spanish
7. Pre-delivery guide
7.1 2019 Portable Spa Pre-Delivery Guide for US, Canada, and International
7.2 2019 Portable Spa Pre-Delivery Guide for US, Canada, and International – French
United States and Canada
1. 2018 Portable Spa Owner’s Manual (before 12/31/2018) USA & Canada
2. 2018 Platinum Spa Owner’s Manual (before 12/31/2018)
3. 2018 Swim Spa(Pro Trainer) Owner’s Manual (before 08/01/2018)
4. 2018 Portable Spa Owner’s Manual (before 07/26/2018)
5. 2018 Veranda Spa Owner’s Manual (before 07/26/2018)
6. 2018 Swim Spa(Neo Pack / Spa Touch / TP600U) Owner’s Manual (before 05/15/2018)
7. 2018 Swim Spa(Pro Trainer) Owner’s Manual (before 07/26/2018)
8. 2018 Platinum Spa Owner’s Manual (before 07/26/2018)
9. 2018 Portable Spa Owner’s Manual (before 05/15/2018)
10. 2018 Veranda Spa Owner’s Manual (before 05/15/2018)
11. 2018 Swim Spa(Neo Pack / Spa Touch / TP600U) Owner’s Manual (before 05/15/2018)
12. 2018 Swim Spa(Pro Trainer) Owner’s Manual (before 05/15/2018)
13. 2018 Platinum Spa Owner’s Manual (before 05/15/2018)
14. 2017 Swim Spa Owner’s Manual
15. 2017 Portable Spa Owner’s Manual
16. 2017 Inground Spa Owners Manual predelivery
17. 2017 Platinum Series Spa Owner’s Manual
18. 2017 Veranda Spas Owner’s Manual
19. 2017 Fitness Spa Pro Swim Owner’s Manual
20. 2016 Portable Spa Owner’s Manual –USA & Canada
21. 2016 Swim Spa Owner’s Manual
22. 2016 Platinum Spa Owner’s Manual
23. 2016 Fitness Spa Pro Swim System Owner’s Manual
25. 2015 Portable Spa Owner’s Manual –USA & Canada
26. 2015 Guide d’utilisation pour Spas Portables, aux États Unis & au Canada
27. 2015 Swim Spa Owner’s Manual
28. 2015 Platinum Spa Owner’s Manual
29. 2015 Portable Spa Pre-Delivery Guide for US, Canada, and International
30. 2015 Portable Spa Pre-Delivery Guide for US, Canada, and International
31. 2014 Portable Spa Owner’s Manual –
32. 2014 Portable spa owner’s manual (Canada only)
33. 2014 Owner’s Manual – Aqua, LES, & Special Edition Spas
34. 2013 Portable Spa Owner’s Manual
37. 2010 Portable Spas (built between 5/20/10 and 12/31/10)
38. 2010 Portable Spas (built between 3/1/10 and 5/19/10)
39. 2010 Portable Spas (built between 11/19/09 and 2/28/10)
40. 2009 Portable Spas, All Models (Except Genesis)
41. 2008 Portable Spas, All Models
42. 2007 Portable Spas, img-responsivetimate to Xtreme
43. 2007 Portable Spa, Family Fun
46. 2006 Portable Spas, Galaxy to Family Fun
50. 2003 Portable Spa, Journey Series
51. 2003 Portable Spa, Victory Series
55. 1999 Spas, Pneumatic and Electronic II and III
56. 1999 Portable Spas, Fiesta and Genesis Series
57. 1999 Portable Spas, Premier and System Series
58. 1998 Portable Spas, Fiesta and Pneumatic Controls
59. 1998 Portable Spas, Premier Series
60. 1998 Portable Spas, System Series
61. 1997 Portable Spas, Pneumatic Controls
62. 1997 Portable Spas, Genesis Series
64. 1997 Portable Spas, Premier Series
65. 1997 Portable Spas, System Series
70. 1992 Portable and Inground Spas
71. 1991 Portable and Inground Spas
72. 1990 Portable and Inground Spas
73. 1989 Portable and Inground Spas
74. 1988 Portable and Inground Spas
76. 1986 Portable and Inground Spas
French language manuals for Canada
1. 2016 Guide d’utilisation pour spas portables
2. 2016 Guide de pré-livraison pour les spas portables
3. 2014 Guide d’utilisation pour spas portables
4. 2013 Guide d’utilisation pour spas portables
5. 2012 Guide d’utilisation pour spas portables
6. 2011 Guide d’utilisation pour spas portables
7. 2010 Guide d’utilisation pour spas portables (built between 5/20/10 and 12/31/10)
8. 2010 Guide d’utilisation pour spas portables (built between 3/1/10 and 5/19/10)
9. 2010 Guide d’utilisation pour spas portables (built between 11/19/09 and 2/28/10)
10. 2009 Guide d’utilisation pour spas portables
11. 2008 Guide d’utilisation pour spas portables
12. 2007 Guide d’utilisation pour spas portables
13. 2006 Guide d’utilisation pour spas portables
14. 2005 Guide d’utilisation pour spas portables
15. 2004 Guide d’utilisation pour spas portables
16. 2003 Guide d’utilisation pour spas portables
Older European and international manuals
1. 2018 Portable Spa Owner’s Manual (INTL) – UK
2. 2018 Portable Spa Owner’s Manual (INTL) – German
3. 2018 Portable Spa Owner’s Manual (INTL) – Swedish
4. 2018 Portable Spa Owner’s Manual (INTL) – Spanish
5. 2018 Portable Spa Owner’s Manual (INTL before 08/01/2018) – English
6. 2018 Portable Spa Owner’s Manual (INTL before 05/15/2018) – English
7. 2018 Portable Spa Owner’s Manual (INTL before 05/15/2018) – French
8. 2018 Portable Spa Owner’s Manual (INTL before 05/15/2018) – German
9. 2018 Portable Spa Owner’s Manual (INTL before 05/15/2018) – Norwegian
10. 2018 Portable Spa Owner’s Manual (INTL before 05/15/2018) – Swedish
11. 2018 Portable Spa Owner’s Manual (INTL before 05/15/2018) – Spanish
12. 2016 Portable Spa Owner’s Manual (INTL) – English
13. 2016 Portable Spa Owner’s Manual (INTL) – French
14. 2016 Portable Spa Owner’s Manual (INTL) – Dutch
15. 2015 Portable Spa Owner’s Manual (INTL) – English
16. 2015 Portable Spa Owner’s Manual (INTL) – French
17. 2015 Portable Spa Owner’s Manual (INTL) – Dutch
18. 2015 Portable Spa Owner’s Manual Australia and New Zealand
19. 2015 Portable Spa Pre-Delivery Guide for US, Canada, and International
20. 2015 Portable Spa Pre-Delivery Guide for US, Canada, and International
21. 2014 Portable Spa Owner’s Manual (INTL) ENGLISH
22. 2014 Portable Spa Owner’s Manual (INTL) FRENCH
23. 2013 Portable Spa Owner’s Manual (INTL) ENGLISH
24. 2013 Portable Spa Owner’s Manual (INTL) FRENCH
25. 2012 Portable Spas (Europe) – English, French, Dutch, German, Spanish, Norwegian)
26. 2011 Portable Spa Manual (Europe) – English, French, Dutch, German, Spanish, Norwegian
27. 2010 Portable Spas (Europe) – English, French, Dutch, German, Spanish, Norwegian
28. 2009 Portable Spas (Europe) – English, French, Dutch, German, Spanish, Norwegian
29. 2008 Portable Spas (Europe) – English, French, Dutch, German, Spanish, Norwegian
30. 2007 Portable Spas (Europe) – English, French, German, Spanish, Norwegian
31. 2006 Portable Spas (Europe) – English, French, German, Spanish
32. 2005 Portable Spas (Europe) – English only
33. 2004 Portable Spas (Europe) – English only
34. 1999 Fiesta, Genesis, Premier and System Line spa owner’s manual (Europe) – English only
35. 1999 Genesis, Premier and System Line spa owner’s manual (Europe) – English only
Discontinued models
Note: The Genesis manuals listed below are for an acrylic spa sold from 2009-2011. For roto mold spa manuals, see the section further down on this page.
1. 2018 Swim Spa(Pro Trainer) Owner’s Manual
2. 2018 Veranda Spa Owner’s Manual – USA & Canada
6. Rejuvenation Spas Fountain of Youth Owner’s Manual
US, Canada, and International
For roto mold spas built from January 2015
1. Genesis Rotomold Spa Owner’s Manual
For roto mold spas built in 2012 to 2014
1. Genesis Rotomold Spa Owner’s Manual
2. Genesis Rotomold Spa Owner’s Manual
3. Roto Spa Pre-delivery Guide
texto second 36KEEPING YOUR SPA WATER CLEAR AND FRESH
Important: Keep the spa covered when not in use!
This information is for new spa owners with no experience with water chemistry. Everyone’s experience with maintaining water quality is different, but there are some general concepts you need to know.
Water maintenance is not difficult, although it requires regular attention. The most important thing to understand about taking care of your spa water is that preventive action is much easier than correcting water quality issues.
Excellent water quality is a simple matter of four things:
1. Chemical Balance
You will need to test and adjust the chemical balance of your spa water. Although this is not difficult, it needs to be done regularly. Depending on your choice of sanitizer, you need to test the level of calcium hardness, total alkalinity, and pH level. Spa owners with a Cal Clarity II bromine generator also need to check total dissolved solids and phosphates.
Click here to learn how to balance your water chemistry.
2. Sanitation
Sanitizers kill bacteria and viruses and keep the water clean. A low sanitizer level will allow microbes to grow quickly in the spa water. We recommend using either chlorine or bromine as your sanitizer.
Spa owners with an ozonator or the Pure Cure system also need to add sanitizer, although their requirements are different.
Learn how to use sanitizers here
The Cal Clarity II bromine generator can NOT be used with chlorine. Click here to learn how it is used.
3. Filtration
Cleaning your filter regularly is the easiest and most effective single thing you can do to keep your water clear. A clogged or dirty filter will cause the heater and pump to work harder than they need to, possibly causing them to fail.
The spa’s heating system will only function with the proper amount of water flow through the system.
Click here for filter cleaning instructions.
4. Regularity
Clear water requires regular maintenance. Establish a routine based on a regular schedule for your spa water maintenance.
Maintaining your water quality helps the enjoyment of your spa and extends your spa’s life by preventing damage from neglect and chemical abuse.
HOT TUB CHEMICAL BALANCE
When testing and adjusting spa water, you have two types of testing methods to choose from:

The Reagent Test Kit:
is a method which provides a high level of accuracy. It is available in either liquid or tablet form.

Test strips:
are a convenient testing method commonly used by spa owners.
TA Scale
BALANCING THE TOTAL ALKALINITY
Total Alkalinity (TA) is the measure of the total levels of carbonates, bicarbonates, hydroxides, and other alkaline substances in the water. TA can considered a “pH buffer”. It is the measure of the ability of the water to resist changes in pH level.
The recommended total alkalinity is 80 – 120 ppm.
If the TA is too low, the pH level will fluctuate widely from high to low. Low TA can be corrected by adding an alkalinity increaser.
If the TA is too high, the pH level will tend to be too high and may be difficult to bring down. High TA can be corrected by adding an alkalinity decreaser.
When the TA is balanced, it normally remains stable. Although adding water with high or low alkalinity will raise or lower the TA level.
CH Scale
BALANCING THE CALCIUM HARDNESS
Calcium Hardness (CH) is a measure of the total amount of dissolved calcium in the water. Calcium helps control the corrosive nature of the spa’s water and is why soft water is not recommended. The low calcium content of soft water is very corrosive to the equipment and can cause staining of the spa shell.
The recommended calcium hardness is 150 – 200 ppm.
If the CH is too low, add a calcium hardness increaser.
If the CH is too high, dilute the spa water with soft water.
When the CH is balanced, it normally remains stable, although adding soft water or very hard water will raise or lower the CH level.
pH Scale
BALANCING THE PH
The pH level is the measure of the balance between acidity and alkalinity.
The recommended pH level is 7.2 to 7.6.
If the pH is too low, it can cause corrosion of metal fixtures and the heating element. Low pH can be corrected by adding a pH increaser.
If the pH is too high, it can cause scaling by allowing metals or minerals to form deposits and stain spa surfaces. High pH can be corrected by adding a pH decreaser.
When the CH is balanced, it normally remains stable, although adding soft water or very hard water will raise or lower the CH level.
Sanitizers kill bacteria and other organic waste by breaking them down to non-harmful levels and are filtered out. Before you fill your spa, you need to decide which chemical sanitizer you wish to use. Consult your Cal Spas dealer for the right decision with regards to your lifestyle and spa usage. We recommend either bromine or chlorine as your sanitizer. Both work well when maintained regularly.
DO NOT use trichlor. Trichlor is very acidic and the hot temperature of the spa causes it to dissolve too quickly. It will cause damage to your spa and will void your warranty.
Whichever plan you decide on, follow it completely and don’t take shortcuts. It will provide you with clean, safe, and clear spa water with only minimal effort. Spa owners with an ozonator will still need to use a chemical sanitizer.
Using Chlorine as a Sanitizer
If you choose to use chlorine as a sanitizer, only use granulated chlorine, not liquid chlorine.
Once a week, check the chlorine level using either a test strip or a reagent kit. See the table on the following page for the ideal range.
Add one or two tablespoons granulated chlorine to the spa water weekly. Note that chlorine dissipation rate will be faster at higher water temperatures and slower at lower temperatures.
When you add chlorine, open all of the jets and run the spa at high speed with the cover open for at least 30 minutes.
Follow the maintenance schedule.
Using Bromine as a Sanitizer
Bromine is a very effective sanitizer that produces low chemical odors. Unlike chlorine, it can break down bacteria and other impurities to a safe level with a low burn-out rate.
Bromine is available in granulated form. Use granulated sodium bromide to establish your bromine base.
When you begin with fresh water, add 2 ounces of granulated bromide. Open all of the jets and run the spa at high speed with the cover open for at least 30 minutes. This is your base bromine level.
Follow the maintenance schedule.
Shocking the Water
In addition to using a chemical sanitizer, you will periodically need to shock the water. Shocking the water helps remove burned-out chemicals, bacteria, and other organic material from your spa’s water and improves your sanitizer’s effectiveness.
Do not use chlorinating shock, which will damage your spa’s jets and pump seals. Only use an oxidizer shock. It can be used with either chlorine or bromine sanitizers.
Add two ounces of oxidizer shock per 500 gallons once a week, after heavy bather loads, or if water has a strong odor.
Spa must be running with all of the jets on high for 30 minutes with the cover open. If necessary, repeat oxidizer shock in 30 minute intervals.
texto third 39WARNING!
Be sure to shut off power to the spa before you remove the filter.
When the spa operates without a filter, there is a possibility that debris may be sucked into the plumbing through the filter well.
The filter is the part of your spa that removes the debris from the water and needs to be cleaned on a regular basis to maximize your spa’s filtering performance and heating efficiency.
We recommend you clean your filter about once a month, depending on your spa usage and bather load.
In addition to spraying off the filter weekly to remove surface debris, your filter should be deep cleaned periodically to dissolve scale and particles that get lodged deep within the filter fibers and impede the filtration process. Even if the filter looks clean, scale and particles can clog the fibers and prevent water from flowing through the filter resulting in the most common spa problem—no heat, caused by a dirty filter.
- Remove the filter by turning it counterclockwise, unscrewing the bottom threads, then pulling it up and out.
- Place the dirty filter into a bucket of water deep enough to cover the filter.
- Add 8 oz of liquid filter cleaner to the bucket of water.
Note: It is a good idea to keep a spare filter to use in the spa while the dirty filter is being deep cleaned. This way, you can rotate the filters and both will last longer.
- Soak the filter for a minimum of 24 hours.
- Spray the filter with a water hose. Spray each pleat carefully.
- Reinstall the filter. Do not overtighten.
REPLACING THE FILTER
We recommend you replace your filter about once a year, depending on your spa usage and bather load. Before you place a new filter in your spa, make sure you remove the plastic wrapper. Soak the filter a minimum of 24 hours before you insert it in the filter well.
Never use a filter too small for your spa’s water capacity!
If you need a replacement filter visit http://quickspaparts.com. 


